Friday, April 30, 2021

AUTOMATIC BATTERY CHARGER

            AUTOMATIC BATTERY CHARGER 


hello  friends  today I am gonna  telling  you  about  some  easy  and valuable  electronics projects 
for  school and  college  practical  

Here is a simple , automatic battery charger built around SCR  2P4M (SCR1),  transistor BC337(T1),zener diode (ZD1) and a few discrete components.

The power supply circuit for the  charger consists of a step-down  transformer (X1)  and bridge rectifier 
comprising  diode D1  through  D4 . the 50Hz ,230V   AC  is  stepper  down by  transformer X1 to output  15V, 1A at the secondary.
fig ; 1 (diagram )
 
 The secondary output is rectified by the full-wave bridge rectifier comprising diodes D1 through D4 and fed to the anode of SCR1. For triggering SCR1, its gate is connected through R1 to the power supply. 
 Red and black crocodile clips are connected to the cathode of the zener diode and ground, respectively. For charging the battery, connect the red clip to the positive terminal and the black clip to the negative terminal of the battery.

 When mains is available, SCR1 gets triggered via R1 and the battery starts charging. When the battery voltage level  goes above 12.6V, ZD1 breaks down and NPN transistor T1 becomes forward biased through R2. T1 conducts to ground the gate voltage of SCR1.
 SCR1 stops conducting and the battery stops charging. Resistor R3 limits the battery charging current. Its value can be changed as per your requirement.

 On the other hand, when the battery voltage goes below 12.6 volts SCR1 gets the required voltage through R1 at its gate and is triggered. The battery starts charging now.
 Assemble the circuit on a general- purpose PCB and house in a suitable cabinet. Connect the crocodile clips to the battery terminals, you have to charge. Fig. 2 shows the pin which configurations of SCR 2P4M and transistor BC337. Use  a flexible wire  for  crocodile  clips  and connect the same to the positive and negative  terminal of the battery . 230V ac main is required to operate circuit and charge battery .


friends please like ,share  and comment   thanks for your support   

TEMPERATURE-DEPENDET SPEED REGULATOR FOR FAN


                    TEMPERATURE-DEPENDET SPEED REGULATOR FOR FAN 

hello  friends  today I am gonna  telling  you  about  some  easy  and valuable  electronics projects 
for  school and  college  practical   


 This temperature-dependent controller for fan speed use an LM35 varies linearly 

 temperature  sensor  IC for precision sensing of the temperature 

the output voltage of LM35 varies linearly  with the temperature changes 

in degrees celsius. 


low output impedance , linear  output variation with input changes  and precise 

inherent calibration of LM35 make interfacing of  this device  to read  out or 

control  circuitry  easy . LM35 exhibits extremely  low  self  heating , as  it draws 

only  60μA  from the power supply and operates  over  a  wide  temperature

range -55℃to +150 ℃.


the output of LM35 is fed  to LM3914, which senses the analogue  voltage  levels and 

drive  five relays. Each relay change the fan speed corresponding to the rise in temperature 

as shown  in table . the output pins of IC2 LM3914 are pulled high

 (through  10-kilo -ohm  resistors ) to Vcc.

 IC2 contains its own adjustable  reference  and an accurate  10 step voltage divider network . the buffer drives ten individual comparators referenced to the precision potential divider

Only five out  of  the ten  outputs of LM3914 are used here to drive PNP transistor T1through T5(eachBC557) .When the temperature  increases, the output of sensor LM35 goes high. As  a result, the  output of IC2 go low one after range. calibration is  done using VR1 as per the  heat received  by the sensor .

Normally, a manual fan regulator has five position. Here we have five relays  corresponding to each regulator position along with resistance network. relay connection along with series resistor network of fan regulator are shown in diagram . At a particular temperature, a relay energises   and its contacts connect the corresponding  fan regulator resistor network to the AC supply. suppose  you  have  calibrated it such  that  when the temperature reaches 25℃, pin 14 of IC2 goes low and  relay RL1 energises. As a  result the fan  starts moving at the lowest speed . similarly, when the temperature reaches 29℃, pin 13 goes low relay RL2 energises and the fan starts moving at a higher  speed than position 1 described in the table . this continues  for position of RL3and RL4 too .

Finally ,when the sensor temperature reaches 39℃, pin 10 goes low to energise  relay RL5.As a result, the fan starts moving at the maximum speed because in the position all the relay are energised and all the resistor  in series with the regulator have been bypassed as shown in diagram 
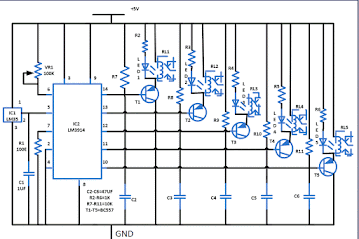

DIAGRAM  1

On the other hand ,when the temperature decreases below 39℃. the relay de-energise one after the other and the fan slows down step by step . The fan stops rotating when the temperature goes below 25 ℃, as relay RL1 de-energises to disconnect power supply to the regulator 

Assemble the circuit on a general purpose PCB and house in a suitable cabinet.

connect the relay contact to the regulator as shown diagram  , shows the pin configuration of sensor LM35and PNP transistor BC557. Use a flexible wire to connect 12V  regulated power supply to the assembled circuit and place it suitably near the fan regulator 

friends please like ,share  and comment   thanks for your support            


Tuesday, April 27, 2021

SMART VIBERATION SENSOR

               SMART VIBERATION  SENSOR  

hello  friends  today I am gonna  telling  you  about  some  easy  and valuable  electronics projects 
for  school and  college  practical 

IN This vibration  sensor  alarm circuit  initially, when power switch S1 is flipped  to 'on ' position power indicator LED1 lights up immediately IC LM555 (IC1) , wired as a simple latch circuit  with control  input ,is powered and  R-C components R4 and C5 connected  at its  reset pin 4 force the latch to standby mode (with inactive  low output ).

 The circuit  is driven  into  sleep  mode .As soon as vibration  is detected MOSFET T1 is fired by the positive going pulse output  from vibration sensing  mechanism  built around  piezo ceramic  wafer and associated  components. As  a result , control  input pins 2 and 6 of IC1 latch are  grounded  output pin 3 of IC1 now  goes  high .

Fig1;circuit diagram

the positive supply from output pin 3 for IC1  is extended to  three -tone siren  generator  UM3561 (IC2) through R5, D1 and R6.Components  R6 and ZD1 stabilise  the input power  supply  of  IC2  to around  3.3v . output  signals  from IC2 are  amplifier by  Darlington-pair transistor T2  and T3 to produce  alert tone (police siren sound ) via  loudspeaker LS1 reset switch  S1 can be used to switch  off the alarm sound by resetting the latch circuit . for safety ,use key- lock type  switches for S1 and S2.

 A relay can also be connected at the  output socket (SOC1) of the circuit to energise  sirens  and fence electrification units. the circuit  works off 9V DC . A compact PP3-/6F22-type  alkaline battery can be used to power the circuit . 

more projects phone  detector 1,2,3,4,5,6,7,8,9,10,11,12,13,14 ,15,16,

friends please LIKE  ,SHARE and FOLLOW  thanks for your support


ELECTRONIC CALCULATOR

               ELECTRONIC CALCULATOR hello  friends  today I am gonna  telling  you  about  some  easy  and valuable  electronics projects  ...